Disclaimer up front: I’m not a professional camera technician (as will become obvious). I’m also not a historian. This isn’t really a complete repair guide or anything. It’s just some things I noticed while fixing my Reflex-Korelle. Maybe it helps someone else, or maybe it’s an entertaining read, if your definition of “entertaining” is also weird.
Models
So there are a few different models of the Kochmann Reflex-Korelle, in random order:
- Model B – screw lens mount, max speed 1/500s, no slow times, no coupling of film transport and shutter cocking. There’s some (more professional) notes about it on the living image camera museum site.
- Models I and II – screw lens mount, max speed 1/500s (though some say that very early Model I’s (without a model designation at the time) have 1/1000s), II has slow times and self-timer. Film transport is coupled to shutter, but film transport does not automatically stop at the next picture.
- Models Ia and IIa – screw lens mount, max speed 1/500s, IIa has slow times and self-timer. Film transport coupled to shutter, and automatically stops at the next picture.
- Model III – the last model, larger bayonet mount, chrome on top and front, max speed 1/1000s, slow times and self-timer (now internally mounted). Film transport coupled to shutter and it probably automatically stops, too.
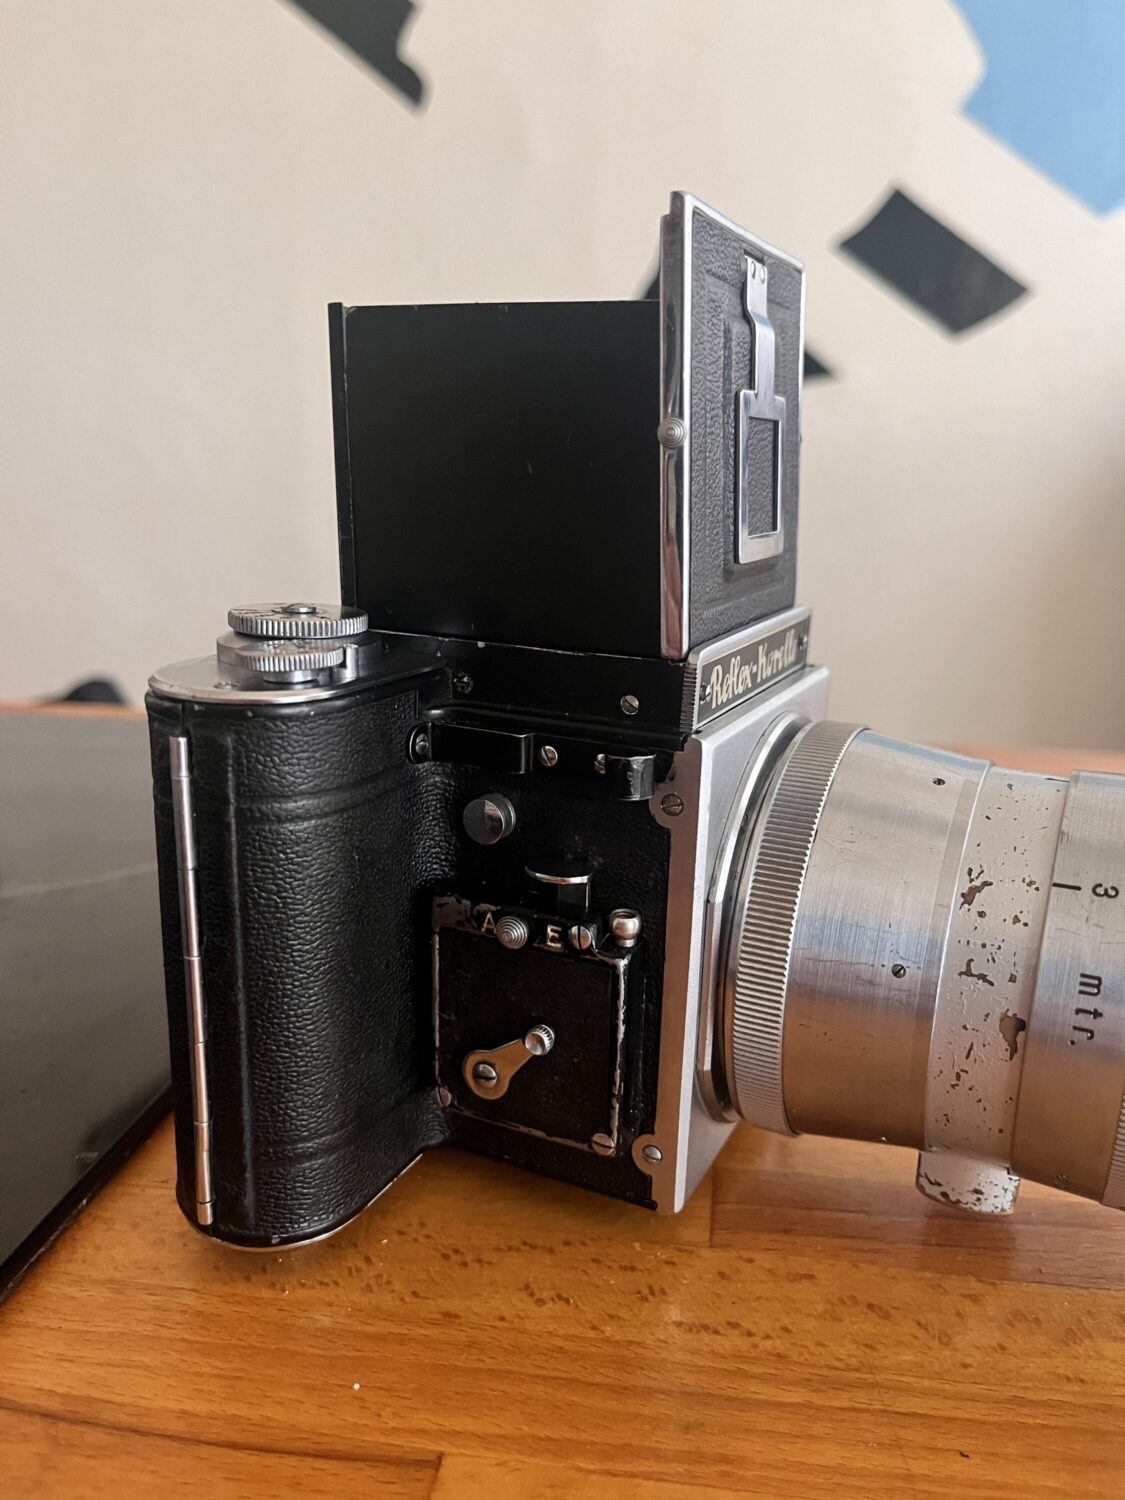
The following notes are mostly about a model IIa, though I mounted a model III’s lens mount on mine, because I got one with some nice lenses (but with missing parts in the camera, which is how I got into this mess in the first place).
Usage
It’s important to understand how this thing is supposed to work – this is for models I, II, Ia, IIa, and probably also III:
- You start with the frame counter showing a number exactly in the middle of the window, and the shutter un-cocked.
- Now, moving the winder on the left side clockwise until it stops (about 270 degrees) will have cocked the shutter. This can not be done in increments, it must be one continuous stroke. If you don’t go far enough, the shutter won’t cock completely and cut off part of the image (or completely unwind again by itself). If you force it too far, a cable in the top part of the camera will break or (more likely) become detached.
- The winder now moves back to its resting position under spring tension, the frame counter will show something between two numbers.
- Now, the winder is moved again clockwise until the frame counter shows the next number exactly centered (this is different depending on how far along the roll you are – between frames 1 and 2 it’s almost one more full rotation, later much less). On Models Ia and IIa, the winder will stop at the right point mechanically. This part can be done in multiple strokes.
- The winder moves back again under spring tension, camera is ready to shoot.
Shutter
As far as I can see, the shutter is exactly the same in models IIa and III. The III just has a speed selection knob with faster times engraved on it (and it’s also a little bit taller because the top plate is slightly different). I’m guessing they achieved 1/1000s just by increasing the curtain spring tension.
That being said – the parts look the same, but they are also not 100% interchangeable. These cameras seem to contain a lot of hand-tuned parts.
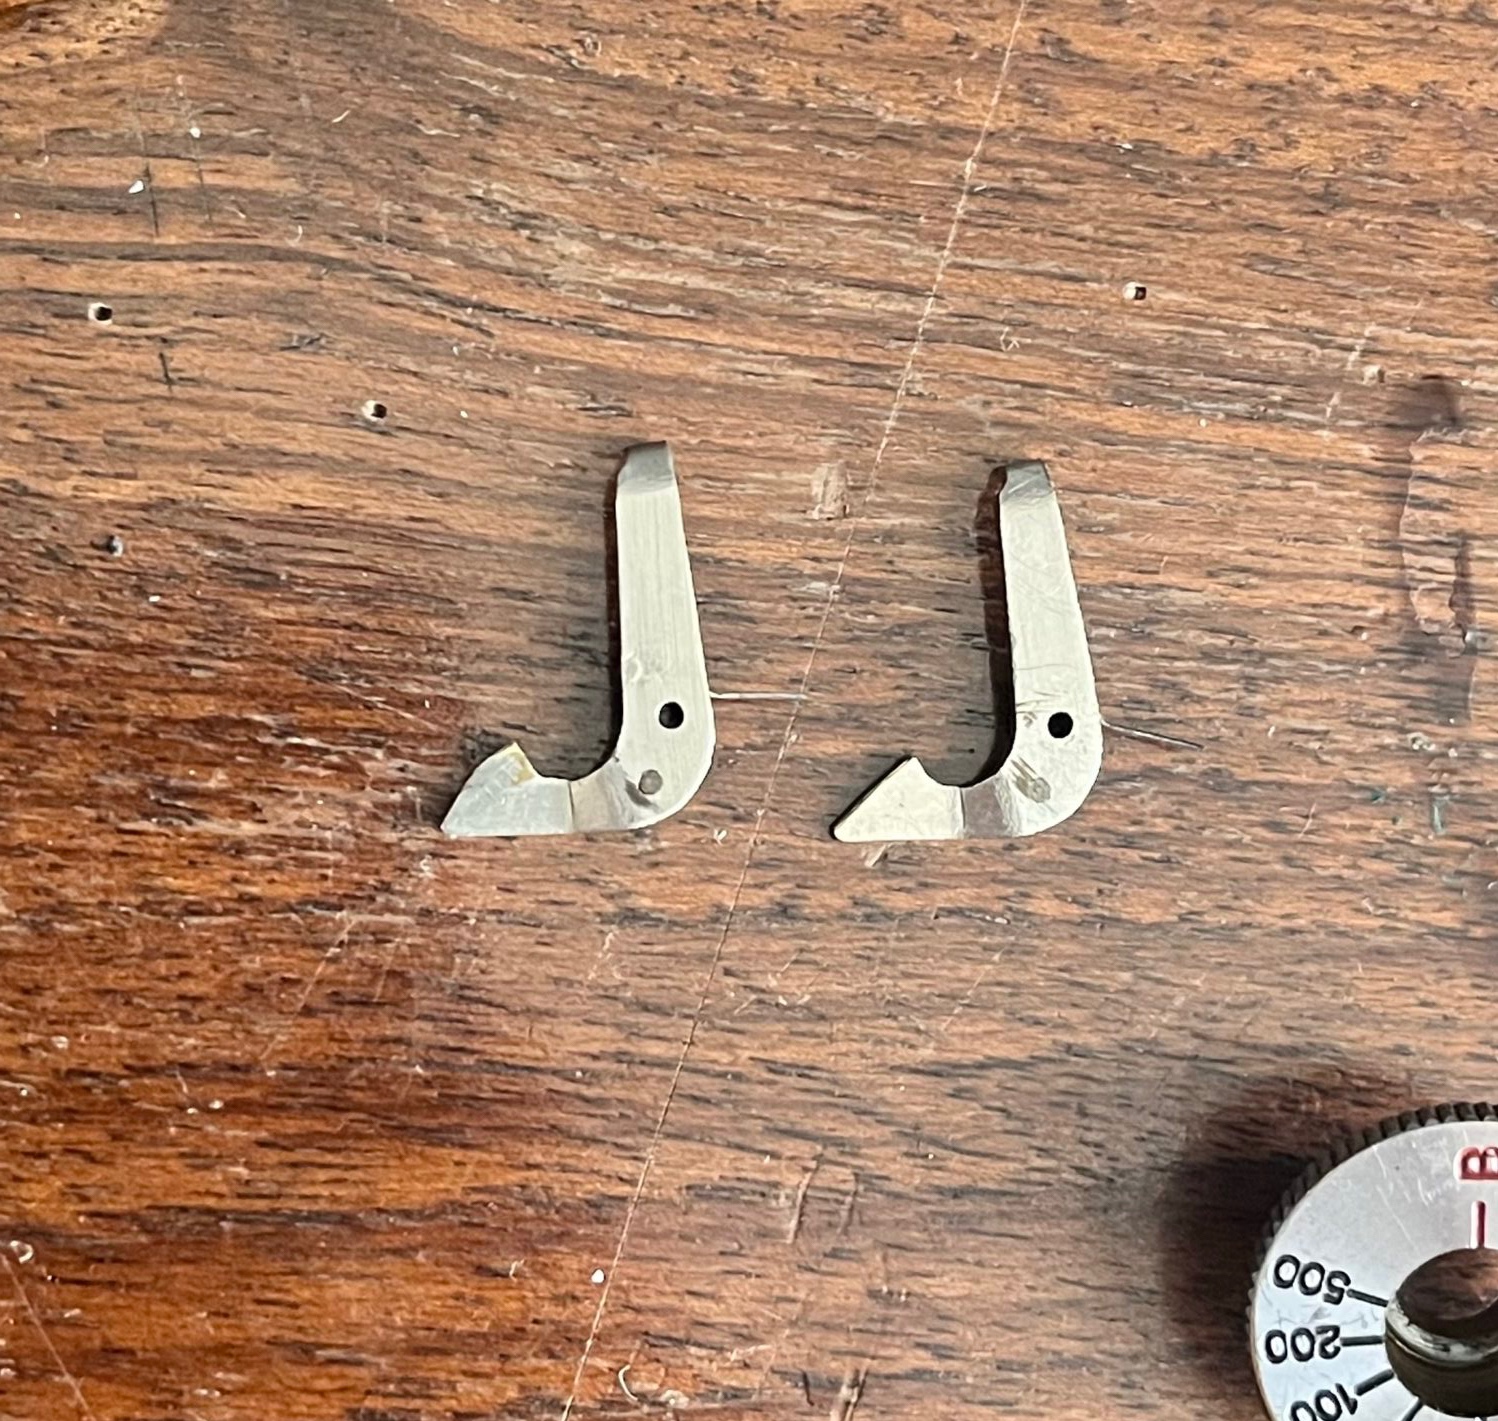
For example, there is a lever that locks-in the first curtain when the shutter is wound, and also interacts with the slow-time part of the shutter. That part looks slightly different in my IIa and III – the one from the IIa would work with the slow-times, but wouldn’t lock-in the shutter reliably. And the one from the III does not engage the slow times properly (I don’t know if it came from the factory like that, or was damaged later, or maybe I’m missing something else – but it’s just a little bit too short) but it does lock the shutter correctly.
The slow-time part of the shutter is otherwise completely separate though, and can be ignored – which I will do because I don’t really understand it fully. Surprisingly enough, it still ended up working on my camera, just seems to run past its actual stop point. I.e. it unwinds too much. But since it fires the shutter at the right point, it’s still surprisingly accurate.
The curtains are held by the large gears in the fast-time shutter, so taking these out will mess up the curtain timing/setup completely. The clever thing to do is probably to first un-tension them (on the left side of the camera) and then record exactly the relationship of large shutter gears and small curtain gear. But I didn’t do that.
Curtains
The curtains on both of my models looked great, so I didn’t have a need to get them out or repair them.
As for tensioning and timing – one can set the timing with the curtains un-tensioned. That is much easier in some ways (they don’t snap back) but also harder in others (it’s difficult to see their real position without spring tension). What worked for me was first re-tensioning both curtains, and then doing the timing. It would be even better to record the original timing when taking the camera apart but I didn’t do that, so I had to set it from scratch.
They are tensioned at the left side, under all the film counter stuff (we’ll get to that side in more detail). They don’t have a ratchet, they are just held in place by two spring wires through the screw heads. What I did was tensioning them with a screwdriver, then ramming a pair of very pointy tweezers into the side of the screw to hold it in place, then I got the screwdriver out, and put the spring wire back.
How much do you have to tension them? I don’t know. There are ways to find out but I just did it by feel. The curtains should snap back quickly, but over-tensioning them might break things (and also makes operating the camera much harder). I think I over-tensioned mine a little bit but that’s something I might fix at some later point. Roughly, very roughly, they need something like 10-15 full turns from their totally relaxed state.
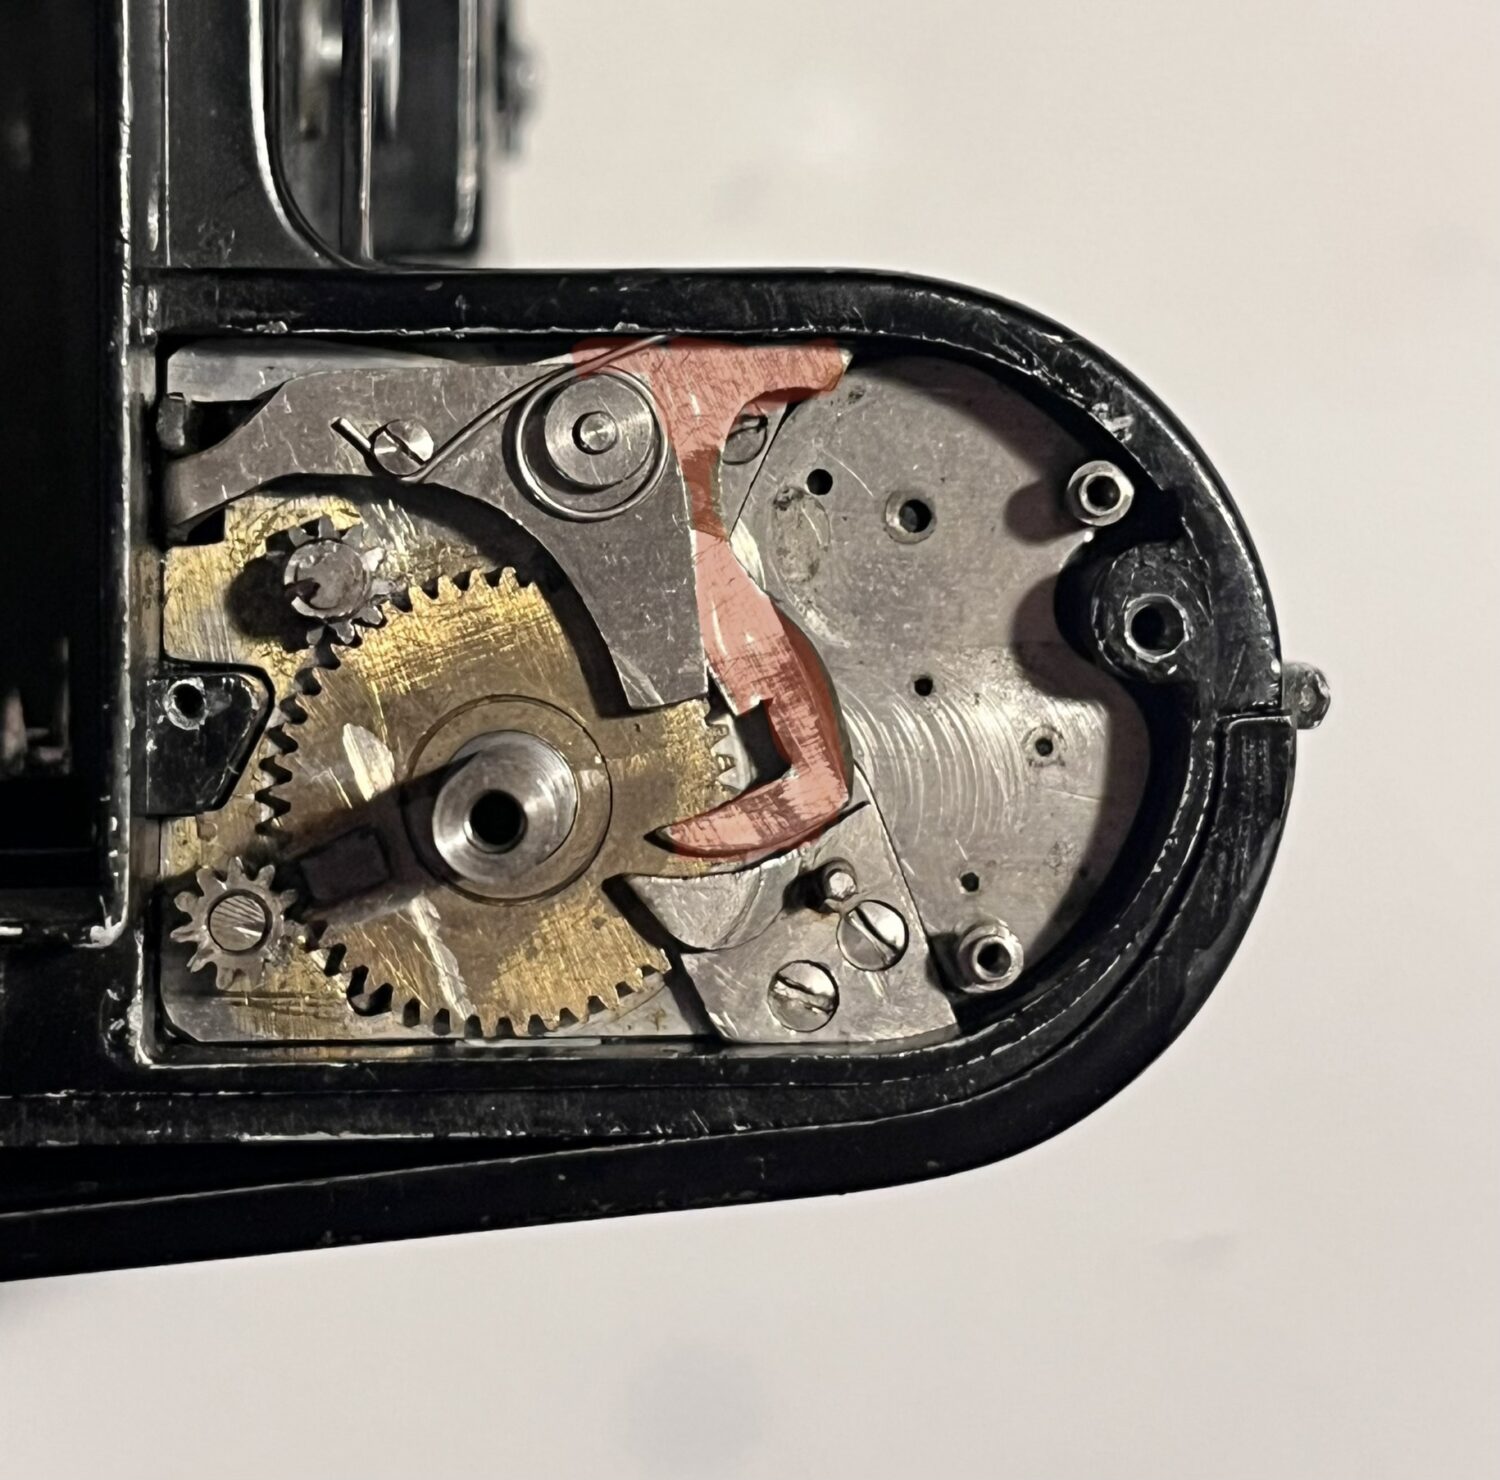
Now to curtain timing – the rear-most one (first curtain? I never know how these are called – the one closest to the film) is relatively easy to do. It’s controlled by the lower large gear in the shutter. That gear can be flipped up juuust enough to turn the small curtain gear independently of it (or more likely, to hold the curtain gear in place while you adjust the larger gear).
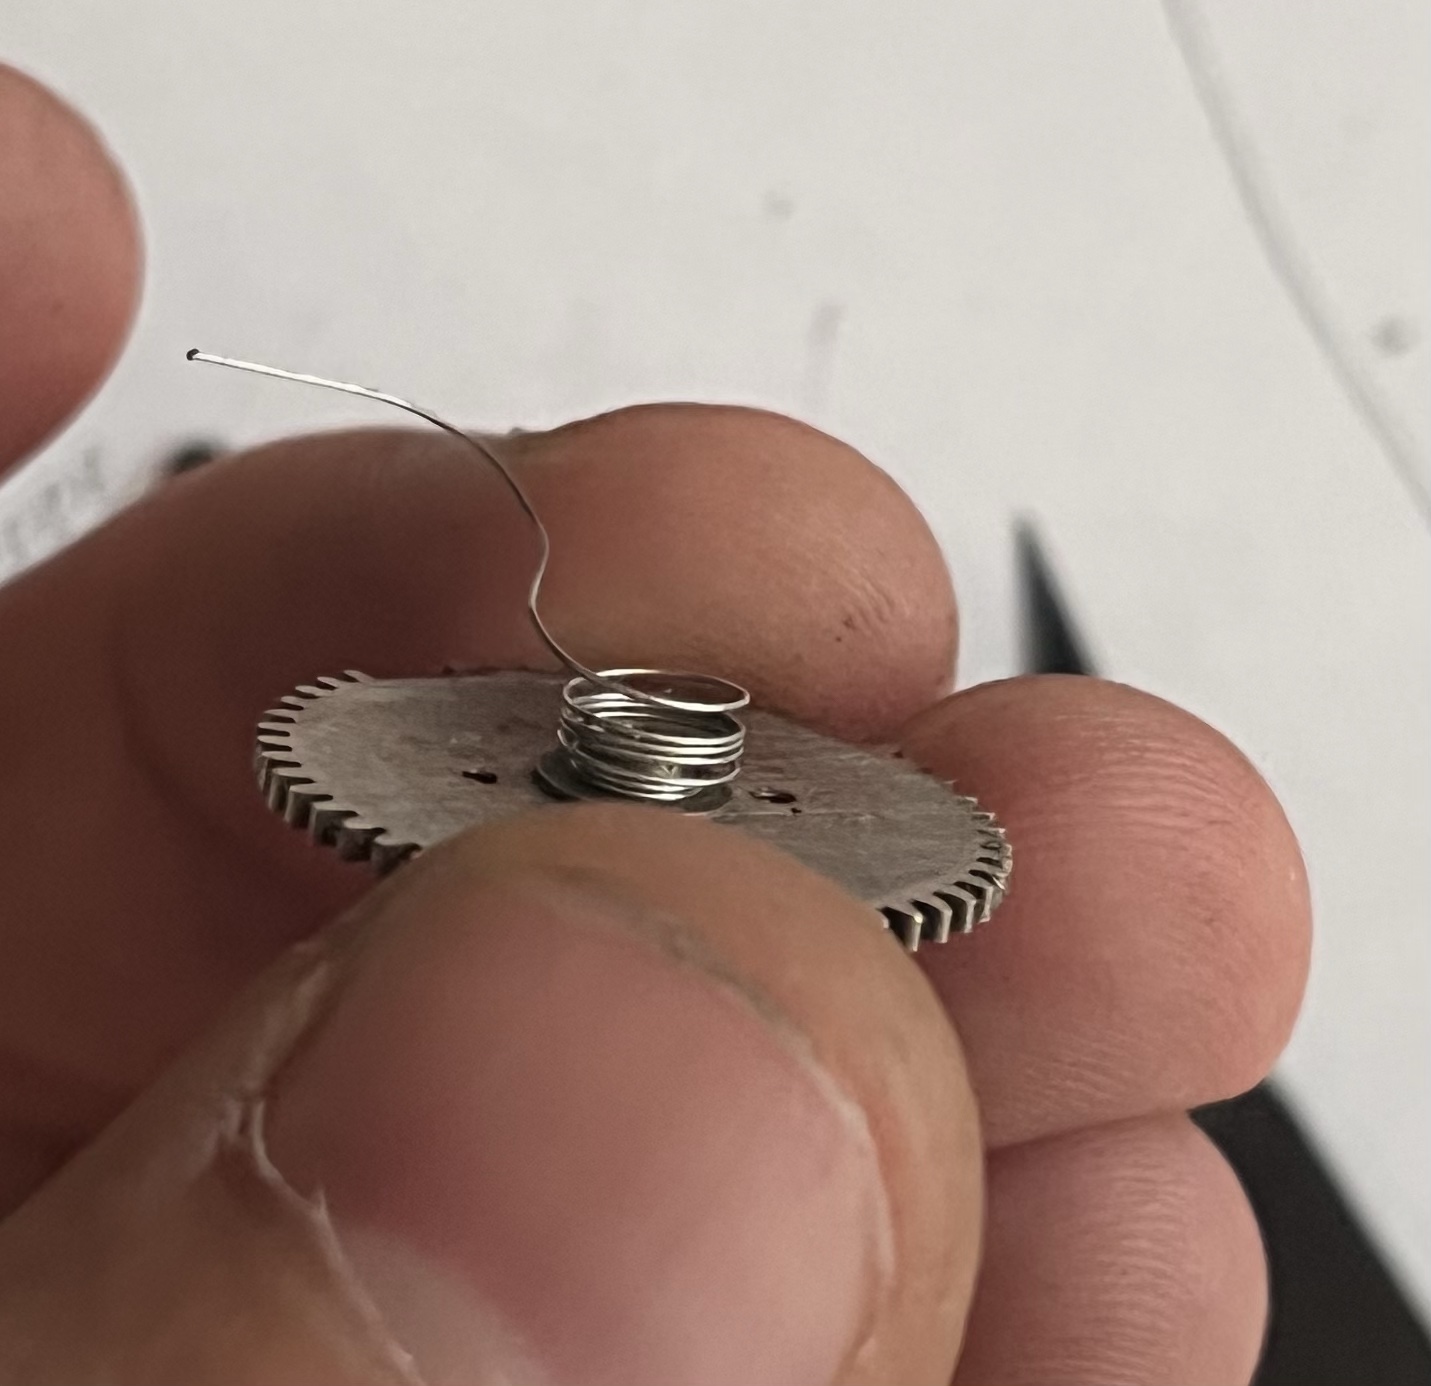
In the relaxed shutter position, without the front curtain shutter gear in place, the back curtain will be a little bit left of it’s final resting position, because the nub on the top gear needs to go between it and the stop. I found it easier to adjust the curtain positions with the shutter cocked: on “B” (or with the speed selection dial removed), the self-timer will hold the rear-most curtain at the fully cocked position. The gear on top can then be wound on until its stop hits the little nub of the gear below it. And its relationship with the smaller curtain gear can be adjusted until the brass edges overlap. This is all very difficult to describe, maybe this picture will help:
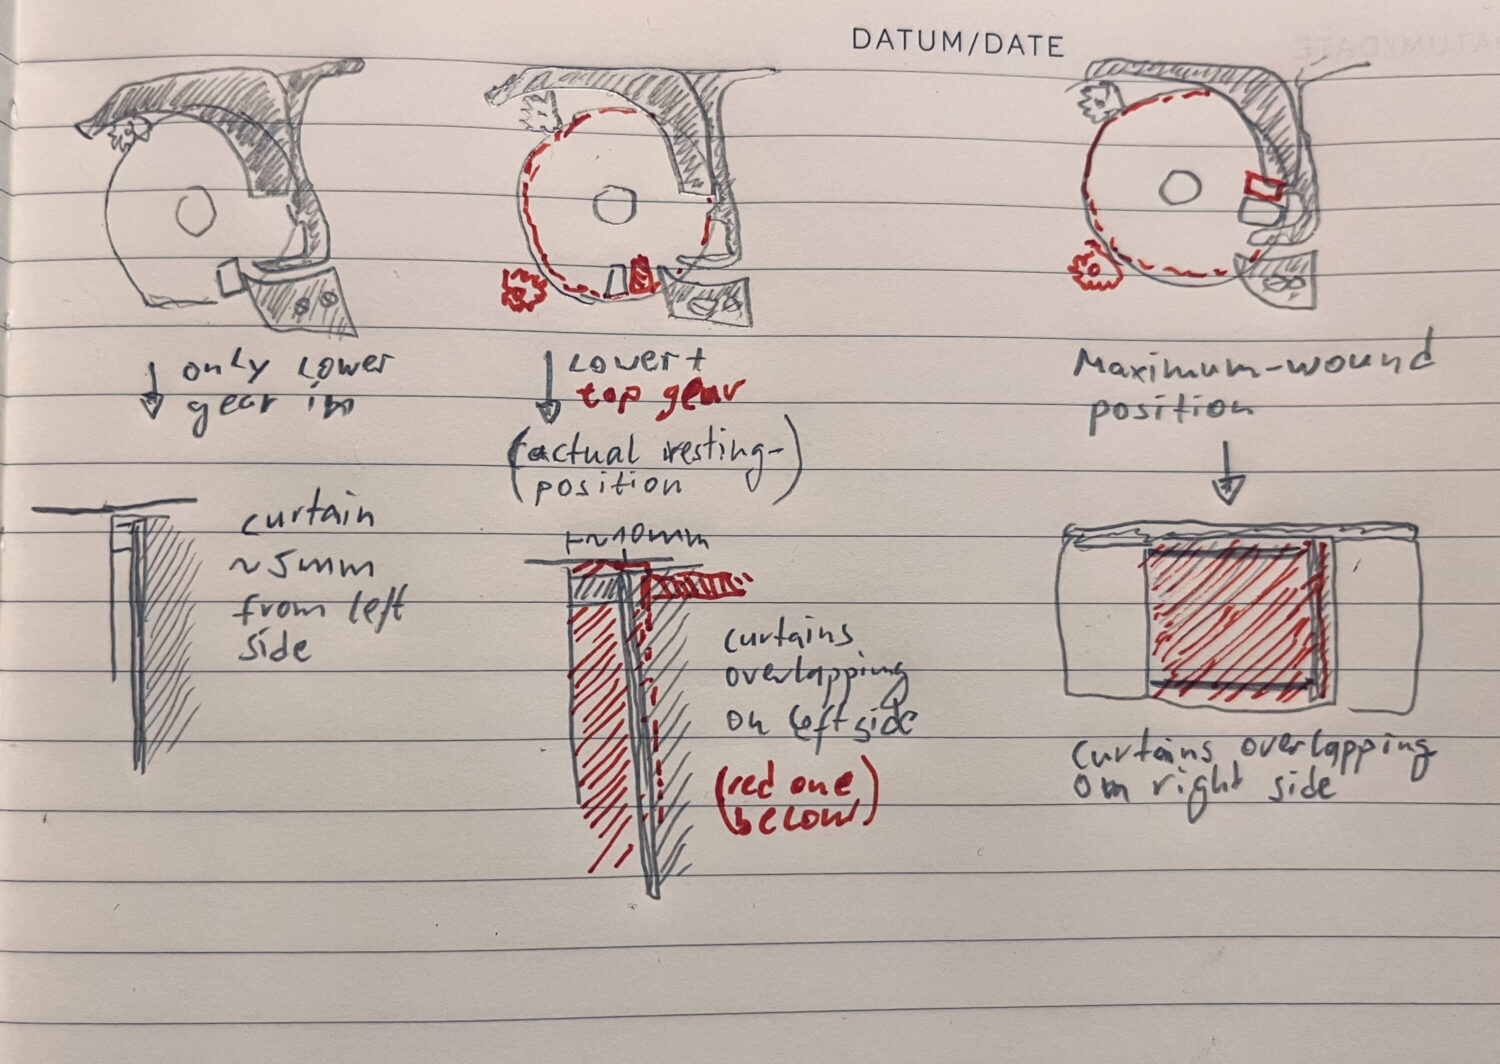
This isn’t so easy to get right – for a basically working camera, you just need two things: having the shutter curtains overlap throughout the whole winding-on process, not letting any light hit the film. And the brass edges shouldn’t roll over the rollers on either side during their full travel. That will result in a sort-of spot on 1/25s time for the shutter (if the curtain tension is roughly correct).
However, to make the faster shutter times work correctly, the overlap between the curtains must be pretty exactly to factory spec, and the curtain tension has to be such that both are traveling at the same speed. I don’t have a good technique on how to achieve that, except measuring and taking slow-motion videos and then re-adjusting the curtains. My own Korelle still isn’t quite there yet – on my first try, the top speed of 1/500s actually came out to 1/100s because the second curtain traveled too slowly – see the word “amateurish” in the title.
Film transport and counter
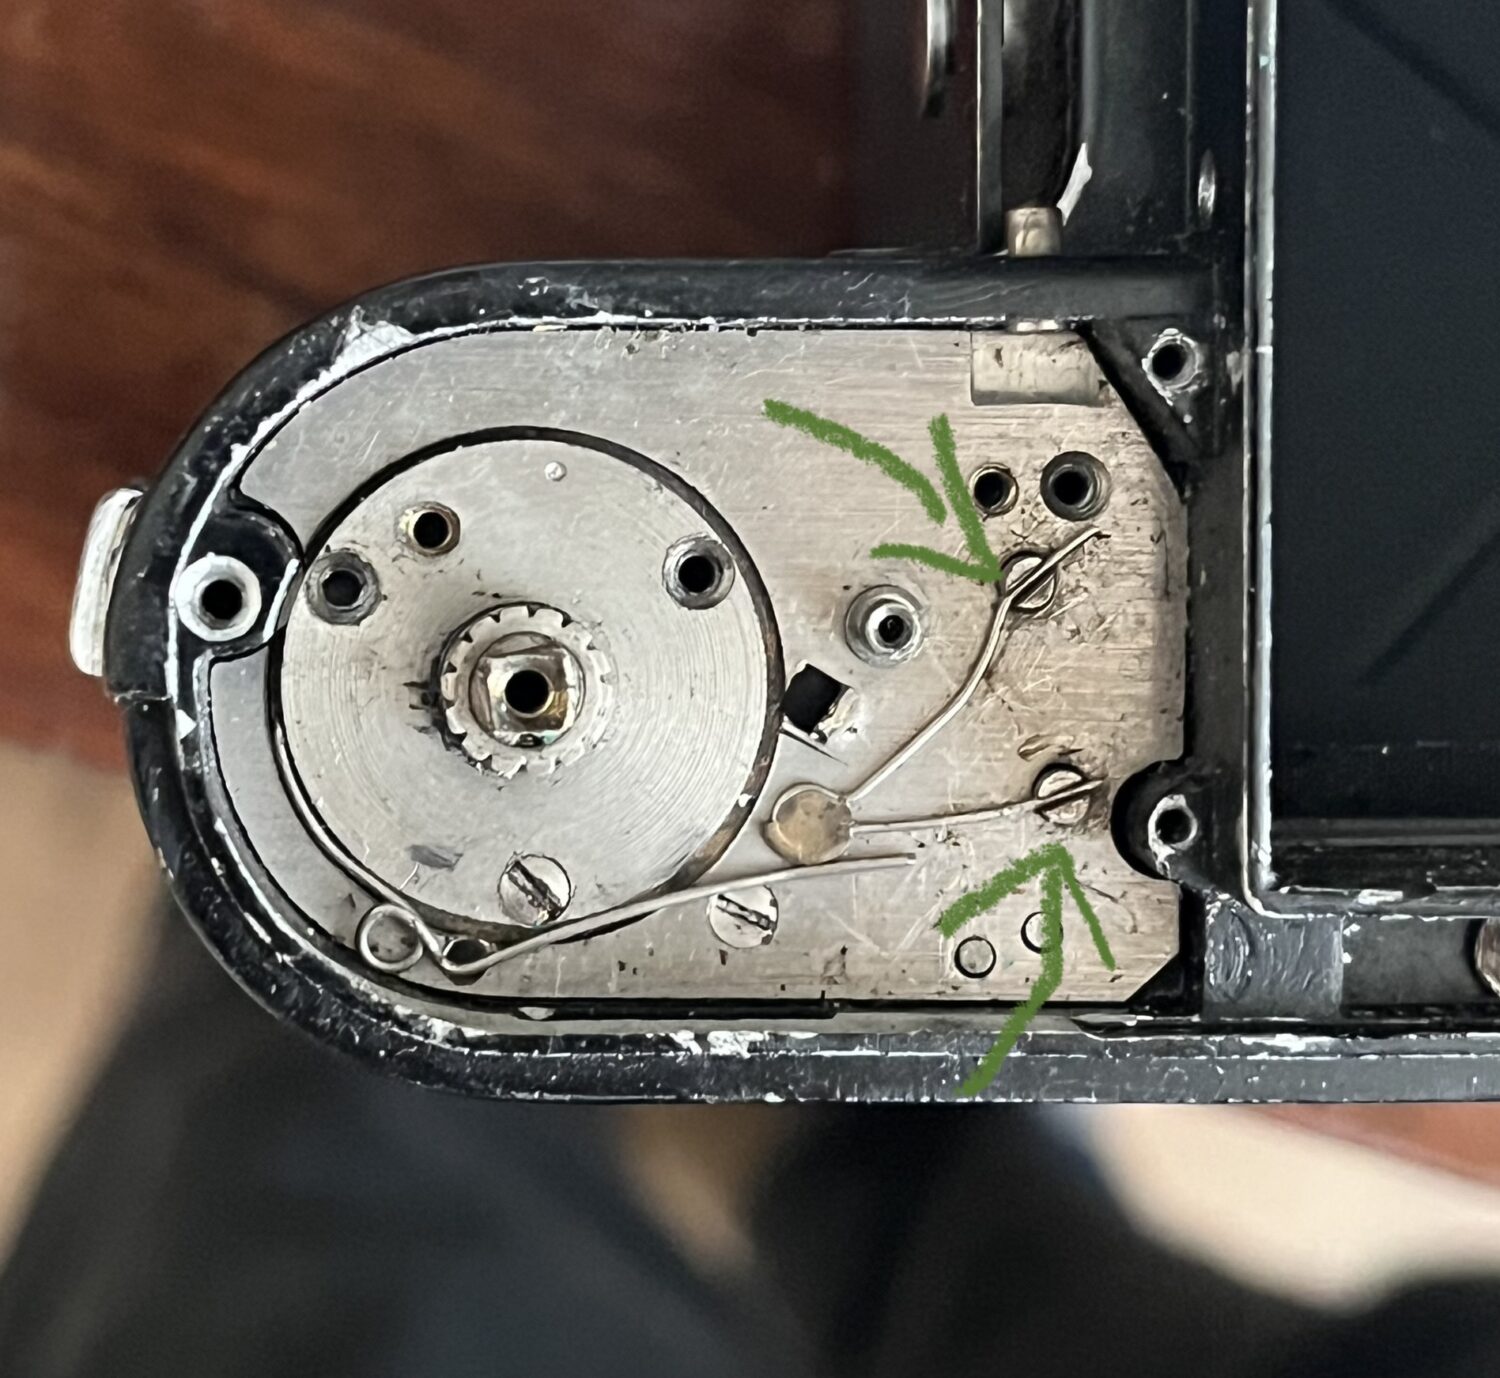
On the left side of the camera, there’s the frame counter, and a little arm that stops it. I’m guessing the older Model I and II (and maybe B) are missing that little arm. Model III is significantly different (there are other screw holes in the shell casting, and the casting is machined slightly differently) but since my Model III was missing all parts on that side, I can’t say how exactly it works in Model III’s.
These parts are all relatively straight-forward, though the spring keeping tension on the film counter was broken on mine, so I made a new one out of a .008 inch high-e electric guitar string, which actually worked very well. The spring has two different diameters, as part of it is press-fitted onto the film counter wheel, and the larger part does the spring action. It also has to fit into the available space, of which there isn’t much. Don’t break that spring, is what I’m saying (but if you do, a very thin guitar string works as a replacement).
Top Plate with Cable
Yeah so this is the part that breaks in these cameras. And also the part of the design that’s a bit weird. Model B’s don’t have that, and are probably better off for it.
There’s a cable running from the film advance lever to the shutter speed selector, which cocks the shutter while advancing the film. That cable also has its own spring keeping it taut (on the shutter side, inside the top plate). The top plate is not actually one solid piece and comes apart, which it must do to fix a broken cable.
That cable has a specific length – it’s not critical to the millimeter, but the spring in the top plate needs to be able to pull the winder against its stop post (counter-clockwise), and there needs to be enough cable to actually wind the shutter fully (clockwise).
The cable itself is originally (if the one in my Model IIa was original) a four-stranded spring steel cable, of about 0.35 mm total diameter. I replaced it with one made of two 0.008 inch (0.2 mm) guitar strings twisted together. Thinner strands would have been better, this is about the thickest steel wire that can still do the required curve radii without work-hardening too much (I hope).
Attaching the cable is very fiddly – on the shutter side, you need to first wind up against the spring, about 120 degrees and then a full rotation more. I wound it by hand and held it in place with locking-jaw pliers. The cable should get pulled in more than 360 degrees when the spring is relaxed (it will probably jam at 360 degrees, that’s not an issue). What you really need when the camera is all together again is just about 270 degrees of cable length (to cock the shutter), but that’s from the where the nub sits on the shutter, and the cable must be under spring tension at that place already.
On the film-transport side, the cable must then be attached so that the spring on the shutter side pulls the winding lever against its stop. The winding lever can only be attached in 180 degree increments, so you need to choose one and kind of fiddle around to see what length works.
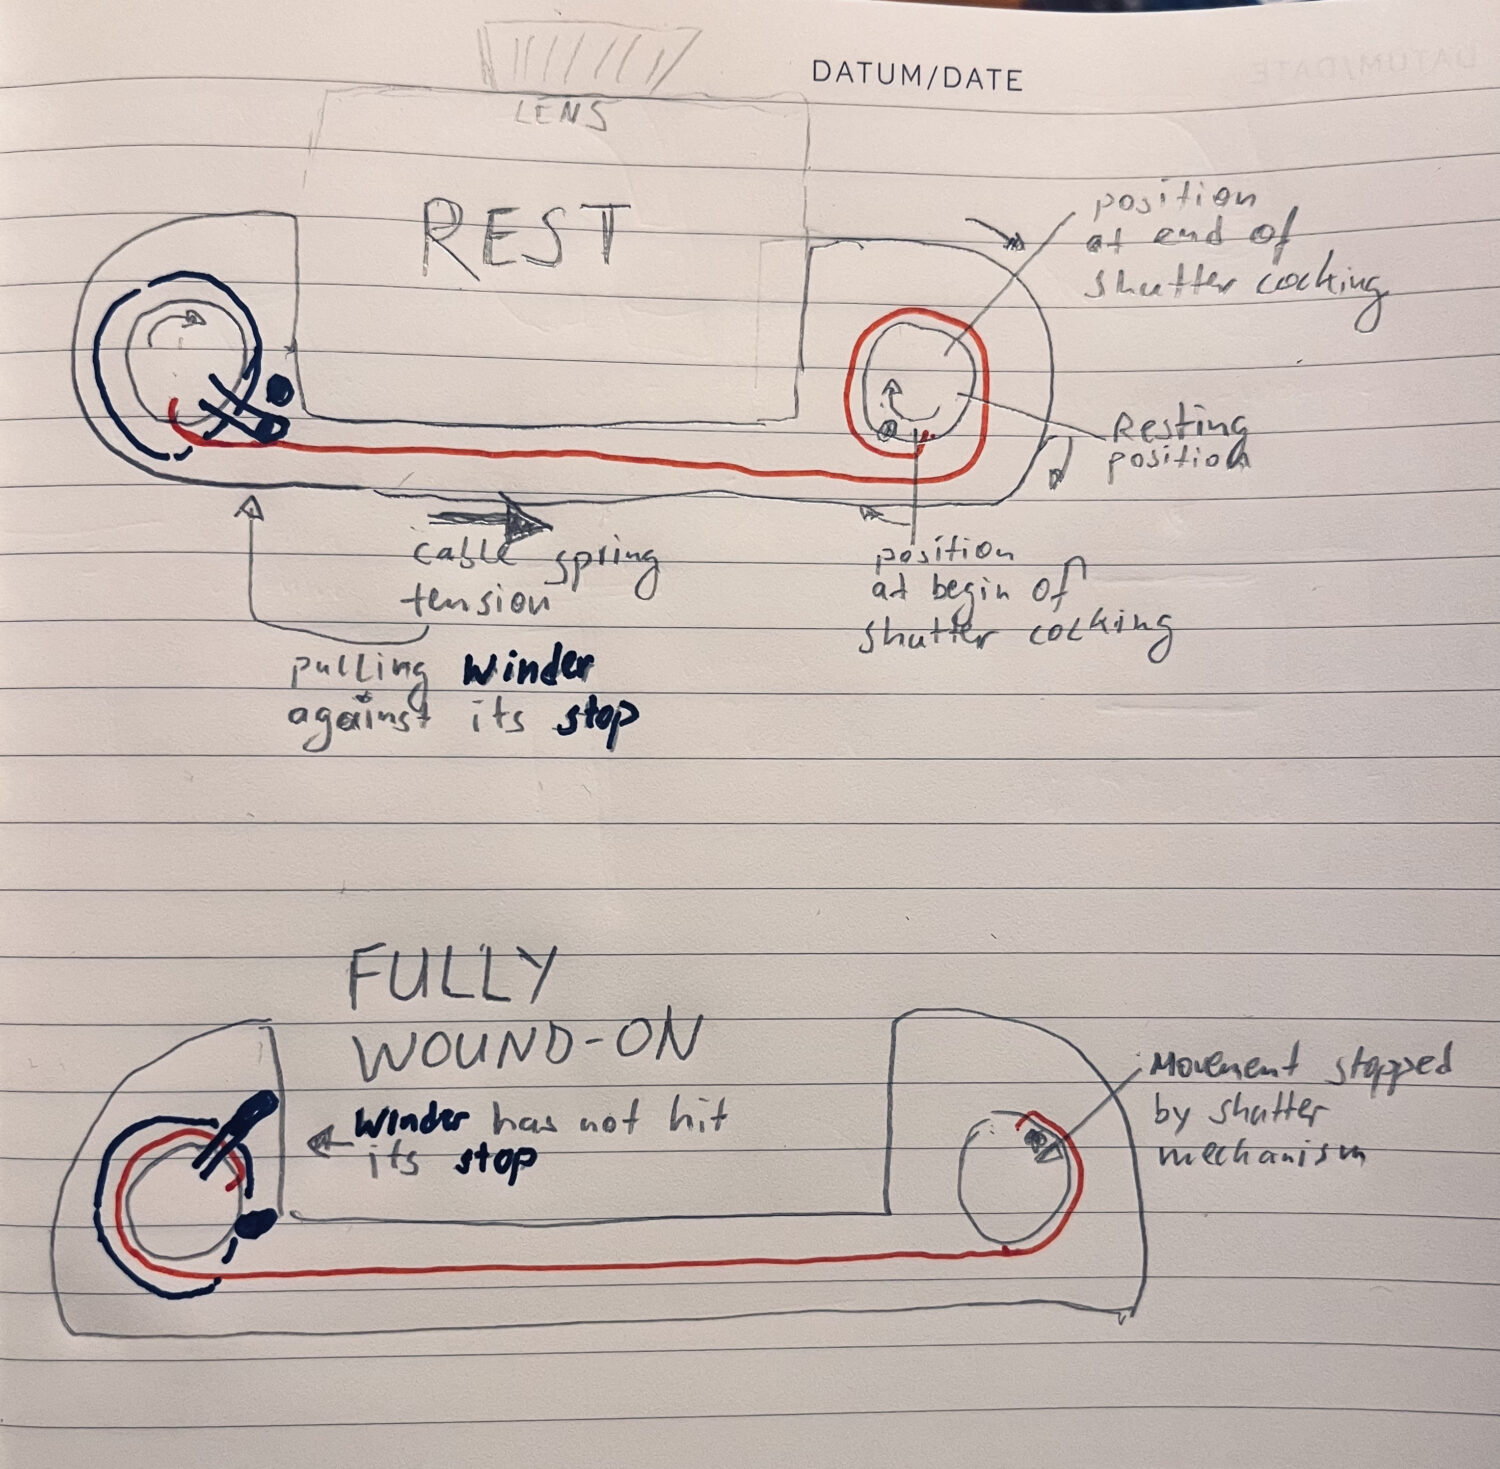
One failure mode is no spring tension at the end of the winder’s travel, counter-clockwise (so it doesn’t get pulled against its stop). That will also probably result in the winder not having enough travel clockwise to fully cock the shutter (it will hit its stop from the other side before it can do that).
The other failure mode is too little cable to fully cock the shutter (i.e. the shutter side will run out of cable before the shutter is fully cocked). The film transport can be done in increments, so that is not critical – but the initial shutter cocking must do the full rotation (actually about 270 degrees) in one swoop.
Actually attaching the cable is also very difficult, it needs to be attached extremely securely. On the shutter side, I managed to clamp it with a screw, but on the film-transport side, that screw was missing in my camera and I couldn’t find one that fits. Soldering may work, knots may also work (but you don’t have much space). What I did was sacrificing one part of the ratchet mechanism on the film-transport side and clamping the cable under one screw that used to hold a pinion spring there. I don’t know for how long this will work, really.
Lenses, lens mounts, other stuff
The front plate of Model III’s do fit the case of Model IIa’s, so you can swap the lens mount as you need. I used a Model III lens mount because I have a nice 24cm Tele for it. When I say they “do fit”, I mean that they kind of do. They are clearly supposed to be the same dimensions (including screw holes) but it took a little bit of filing on my Model IIa’s casing to make it all fit.
The Model III (bayonet) f2.8 8cm Tessar lens actually includes a sort of adapter between previous models and Model III – the bayonet fitting of the lens can be removed from the lens, and then it fits the older Reflex-Korelle screw mount. Conversely, that bayonet fitting can also be attached on other screw-mount lenses – so adaptation in that direction seems always possible (i.e. – a Model III can take all older lenses, using that bayonet adapter piece).
In the other direction, that doesn’t always work – the Schneider Tele-Xenar I have for the III can not be tricked/converted into fitting the older models – its rear diameter is too large anyway.
The light baffle on top is completely interchangeable between all models, as is the mirror and the ground glass.
The mirror lift-up mechanism on the Model III is a bit different from earlier models, since the III has the self-timer inside the mirror housing. I didn’t need to touch any of that on my cameras, so I didn’t.
Result
A working Reflex-Korelle, that actually makes pictures (see previous post). For how long, we will see.


Leave a Reply